Review: Combatives For Concealed Carry: Clinch Fighting Volume 1

I’m always looking to improve my grappling. I do my Jiu Jitsu and get together with training partners and integrate grappling with weapons whenever I can. However, it’s very difficult to find instructional media that deals with grappling in a weapons based environment. Justin White of Mad Science Defense has a series of DVDs about this topic.

In case you don’t have time to read this: I recommend this DVD.

Chapters and Topics:

  1. Introduction – An explanation of why we might need to deal with a standing contact range fight with weapons.
  2. Dummy Guns
  3. Weapons Access- Discussion of accessing a weapon while in an entangled fight. Discussion of a universal draw stroke.
  4. Posture/Angle/Level- A solid discussion of the fundamental requirements to have sharp grappling.
  5. Clinch from Strikes – Achieving the clinch from a Cover and Crash or off of a striking blast.
  6. Clinch from Grabs – Front, side, and back
  7. Offside Underhook – Options for when your weak arm has an underhook
  8. Strongside Underhook – Options for when your strong arm has an underhook
  9. Overhook – Options for when you can’t achieve an underhook.
  10. Skill Development – Drills to work at home. 1-2-3 dominance drill, slo-mo drill

Extras:

  • Choosing Dummy Weapons
  • Using a Training Dummy
  • Striking With a Handgun
  • Scenario Training

Things I loved:

Expert grappling instruction. It is obvious that Mr. White is a talented grappler and instructor. His teaching progression is logical and starts with the fundamentals of posture, angle, and level and he then introduces techniques that will allow you to close distance and achieve a clinch. He progresses from a solid clinch (underhook and far-side wrist control) to either a tie up, or taking the back of your opponent. He finishes the progression with accessing weapons from these dominant positions.

His details cleared up a few sticking points I have been having while standing. I’ll be taking them to our training group. His emphasis on doing the work was much appreciated. He urged the viewer to seek training and emphasized that this stuff won’t just happen if you don’t practice it. He even gives some exercises to work with a partner to get better at this stuff at home.

Good stuff.

Minor Gripes:

I don’t envy anyone who has to try to cram a topic as dense as standing weapon-based grappling into an hour presentation. There just isn’t enough time to mention all the details. For the person who hasn’t seen this material before, I would have loved to see a brief discussion on why the clinch is such a viable fighting platform for an extreme close range problem. Why we don’t want to get in a speed draw contest with our opponent at close range. Mentioning the importance of monitoring hands while in a clinch to prevent the other guy from getting his weapons, as well as a discussion of why underhooks are such a dominant position just in case the viewer doesn’t glean that from the instruction. But of course I understand why it was omitted, those ideas were inferred in the material and we only had an hour.

The other gripe I have is in one of his tie-up positions from an overhook. He advocates shooting from this position while pointing his gun at himself (43:00 of video). I know (from simunition experience) that it’s easy to shoot yourself if you’re not super careful about your muzzle-target line. I talked with Mr. White about this and he recognized that it was a bit of an oversight. This was the only flub like this I noticed.

In conclusion:

This DVD would be a solid buy whether you have experience grappling or not. If you have trained with any of the Shivworks collective, this will be a good reminder of your options in the clinch. If you haven’t, you’ll get an idea of what this topic is about. I hope I get to train with Justin one day, as he has a lot to teach. I need to pick up his ground fighting DVD next. Recommended.

Be Safe,

Mark

If you find value in my posts, please consider subscribing and sharing. And please do your Amazon shopping through our affiliate link.


Sig P250 – My ’16 shot revolver’ – 2000 round test – part 1

In an effort to put my money where my mouth is regarding moving to a defensive pistol that is ‘safer’ as a result of a longer trigger, I recently picked up a Sig P250 compact. My friend and the best shooter I know, K.C., recently got one as well, and I admit his purchase pushed me over the edge. Our philosophies on defensive guns are pretty well aligned, and I’m looking forward to seeing what he can accomplish with the gun.

Author Tamara Keel also did some extensive testing with the .380 model. Article Here.

I was able to find one at Academy Sports for $400 new. By all accounts, I got a pretty good deal on it. The upside to wanting a gun that no one else does is that you can buy them cheaper. It seemingly has everything I was looking for.

  • Smooth, revolver-like double action only trigger
  • Exposed Hammer
  • Glock 19 size envelope, with bonus ability to switch grip frames easily and cheaply
  • Rail with ability to use a Surefire X300U weaponlight for the house gun role
25 yds, 10 shots slowfire

My intention is to keep good range records and do a 2,000 round test, as my friend Todd Louis Green was fond of doing. My training volume is quite low at the moment, and this test could take a while. I’m OK with that. I will be doing range trips, some training, and some competition. I’ll report back as the round count grows. I also will try not to bore you with range trip reports, only when I reach significant round count milestones. I also do daily dry-fire practice, and I estimate the dryfire will in the 10’s of thousands by the time 2,000 real shots happen.

My initial thoughts after Two Range Trips

It really does feel like a revolver trigger, but smoother and a bit lighter. I dig it. Factory sights are serviceable. I blacked out the rear white dots as they were overpowering the front spot during recoil. I’ll probably dab some orange paint to increase front sight visibility a bit more. My shot to shot split times on a piece of paper at 7 yards are about .10 slower than a striker fired gun. .34 seconds or so. I’m not a fast or talented shooter.
I’m willing to trade .10 seconds for the peace of mind that I get from the longer trigger. I also am willing to put in the extra work that a longer DAO trigger demands for proficiency. The daily dryfire of my J-Frame is paying dividends here, though the Sig’s trigger is much smoother and lighter than my snub.
I seem to actually be MORE accurate with a double action trigger. I feel like I pay more attention to the sights during the trigger press and I have been getting a very clear read on my sights during the shot cycle. Claude (The Tactical Professor) told me that he has noticed the same thing.

Drills performed over two long range trips:

  • NRA Marksmanship Qualification Program (qualified Distinguished Expert), the 100% accuracy standard over 220 rounds is what makes this one tricky. I encourage you to try it.
  • Dot Drill (USPSA version)
  • Family Downrange Scenario
  • Presentations from low ready and compressed ready at 7 yds on 6″ circles (I can’t draw from a holster at my indoor range)
  • 10 rounds @ 25 yards on B8 bullseyes
  • Dot Torture  – Got a 38/50 today at 4yds. Lots of room for improvement. Managing the new trigger and having patience on target transitions and after reloads.
  • 3×5 card walkback drills – made it to 16 yards, starting at 4 yds in 2 yd increments.
  • 2 and 4 shot rapid fire strings on full sheet of copy paper at 7 yds to work on tracking the front sight and working the trigger smoothly.

img_1912

So Far:

600 Rounds of 115gn practice ammo

0 stoppages

0 malfunctions

0 parts broken

Away we go…

Mark

If you find value in my posts, please consider subscribing and sharing. And please do your Amazon shopping through our affiliate link.


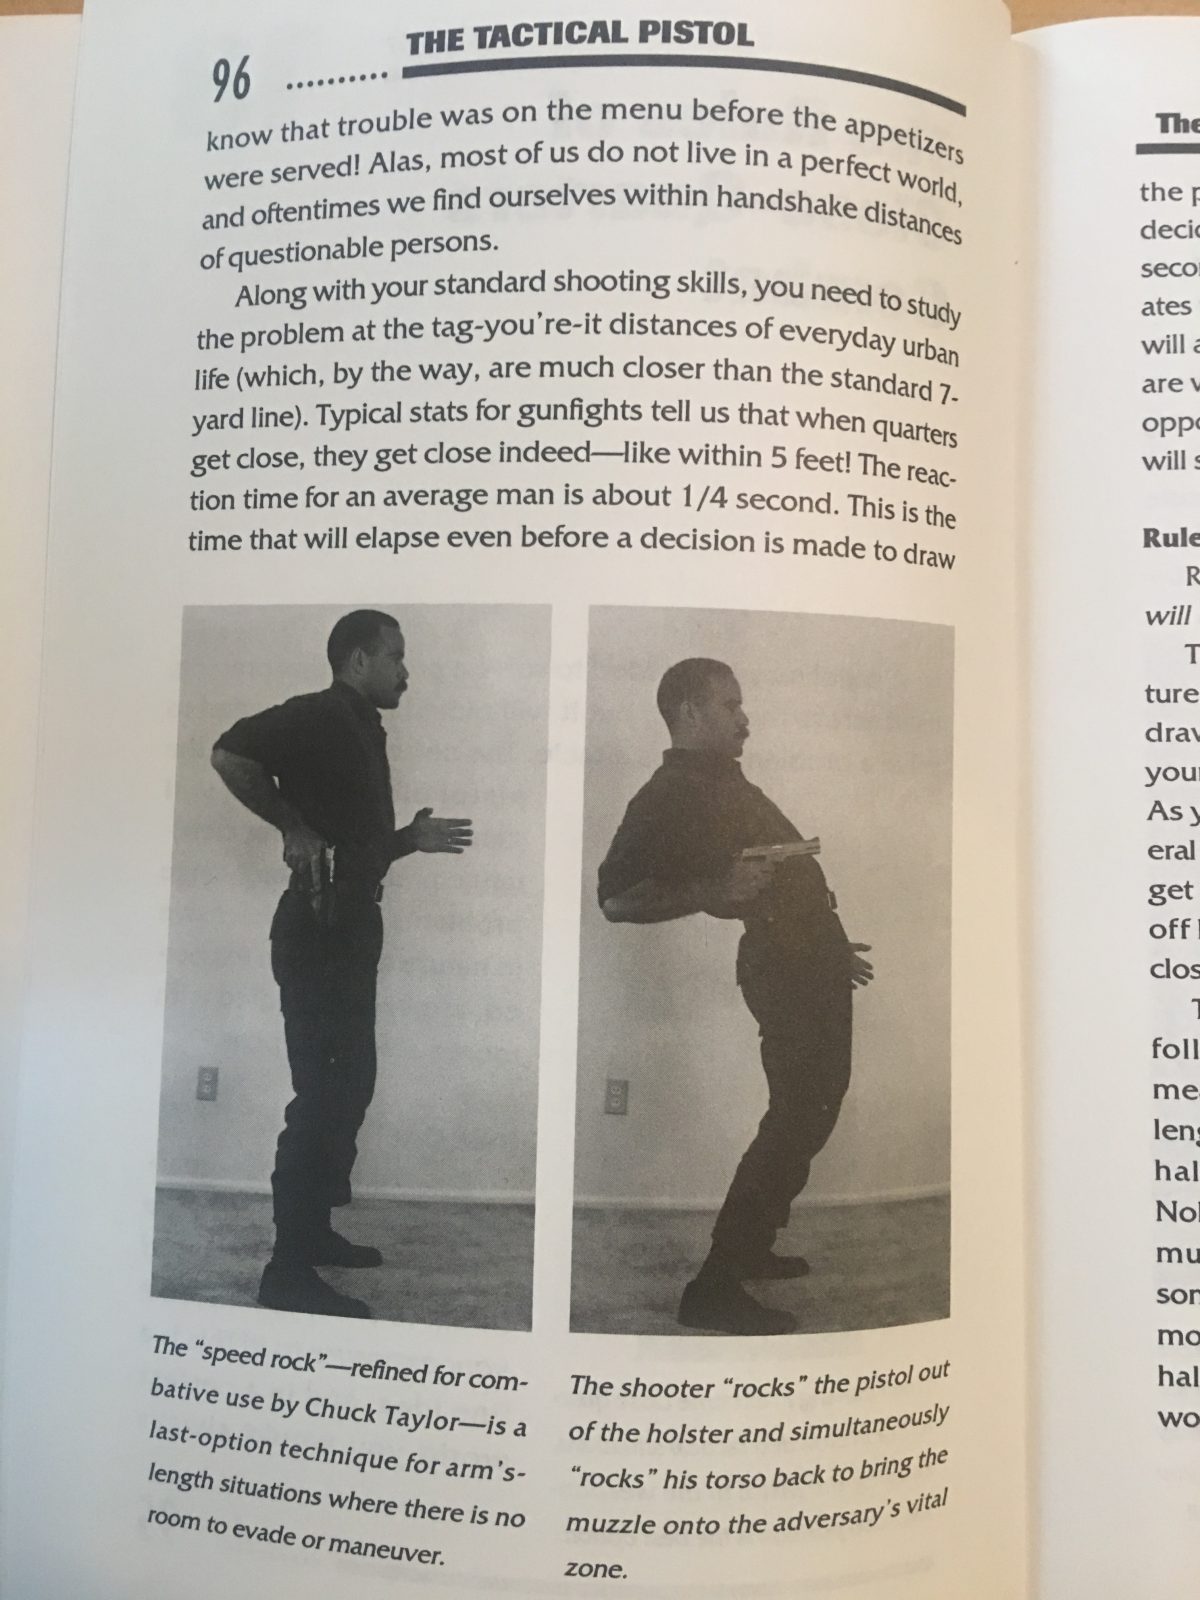
Technique: The Revival of the Outdated Speed Rock on Social Media

The proliferation of Instagram and Youtube shooting sensations has brought with it a disturbing trend. I have noticed that in MANY of the shooting I’ve seen in the 15-60 second cherry picked drills they decide to post, they use the ‘speed rock’ retention position for contact distance shooting. Then they show you their timer to show how quickly they can complete a contact distance drill. This is an oversimplification of the problems that arise in this contact distance situation. I have to set the record straight because people are actually watching this stuff and considering it to still be legitimate technique. Long story short, it’s not.

img_1761

Here’s one IG example so we’re on the same page. Watch his posture as he leans back and back pedals away from the target. Boy howdy, he sure is fast!!! Unfortunately, this is more than a speed shooting problem.

Note: This is nothing against this guy. He's a better shooter than I'll ever be. I just don't want people to think this is viable against a resisting opponent. When you get to initiate a sequence against stationary targets with no free will, ANYTHING will work. Add another human and things get more slippery.

#repost from @truexodus Decided to work with my new @lake_county_knife_and_tool pokey device tonight. Just working a few scenarios in my head. Naturally, when fighting with an opponent with arms and weapons things are a bit different. One of the things people tend to forget is that the bad guy doesn’t know or expect you’re carrying a weapon. So when you decide to act, act quickly and with great violence. Please don’t practice shooting from retention. Remember, I’m not a professional. I’m just a no body preacher trying to develop myself by getting out and using the skills I’ve learned from other professionals to increase the likelihood of my success in a deadly force encounter. #trustandard @rubberdummies @salientarmsinternational @lake_county_knife_and_tool @nevadaammunition @trexarms PS: I don’t care if you don’t like rap.

A video posted by Rubber Dummies (@rubberdummies) on

Here’s the issue…The Speed Rock is a POOR technique!

What is the Speed Rock?

From The Tactical Pistol 1996 “The “speed rock” refined for combative use by Chuck Taylor is a last-option technique for arm’s length situation where there is no room to evade or maneuver. The shooter “rocks” the pistol out of the holster and simultaneously “rocks” his torso back to bring the muzzle onto the adversary’s vital zone”

So, 20 years ago, when folks were still really into the Weaver stance and mullets, this was the state of the art. So why was it a technique worth learning back then? It was the attempt to deal with the obvious real problem of a contact distance fight, in which so many police and citizens find themselves. It was an early beta technique which has evolved to higher percentage techniques. Here is a great article on its history.

It is FAST! You need only clear your duty holster, drop your elbow and bow forward at the hips to bring the muzzle slightly above horizontal, and you can start pressing the trigger as you back away. The more you drop your elbow and sacrifice your base with bowed hips, the more the impact zone will rise on the target. I think this is why the IG-speed shooter guys do it. Showing a timer after a drill like this seems impressive to their ignorant followers. Ignorant, not stupid. I’m trying to educate the ignorant.

Apparently it’s still taught by some very decorated guys from the special operations community. I will remind you that being really good at shooting people with a carbine in a military setting doesn’t necessarily directly translate to a criminal assault at a RedBox in front of a gas station when you’re wearing a subcompact gun under a T-shirt. It’s more than a shooting problem, it should be treated as a combative/grappling problem that happens to include weapons.

That, and Tom Cruise did it in Collateral…

Why it Sucks and You Shouldn’t Practice It


  1. The first and most important issue is the complete sacrifice of athletic base to achieve the position. Hips forward, torso back, weight on heels. Bad. This is the EXACT position you want your opponent to be in when you perform a body lock takedown.
  2. It is demonstrably easier to sustain an impact when in an athletic base (weight on balls of feet, nose over the toes, spine in alignment) than when your weight is on your heels (only people tripping over things backwards do this).
  3. The gun is actually NO FURTHER AWAY than it would have been with good technique. You have sacrificed your mobility and ability to sustain impact for ZERO extra distance. Bad trade.
  4. You can not move backwards faster than someone can charge you.
  5. Pistols suck at stopping people. Question: What does a person do after they are shot? Answer: Whatever they were doing before they got shot. Sacrificing mobility and your base for maybe 2 shots to the lower abdomen before you’re in a grounded gun fight is a bad trade. A motivated attacker will push through you and eat your lunch. Not to mention several attackers.
  6. The upward angle is meant to put rounds into the adversary’s thoracic cavity for a more reliable stop. The problem with this is that a miss at an upward angle means a bullet that can travel extreme distances. To demonstrate my point, watch Aaron Cowan of “Sage Dynamics” advocate stitching the target by breaking the wrist to achieve higher and higher shots. Three problems with this. One, when the other guy is moving, the floaty bent wrist index falls apart and it compromises wrist strength for retention. Two, where would those missed shots land when fired at an upward angle (edit: Aaron’s range is private land and has a large wooded area behind range)? Three, if your other hand is fending or tying the other guy up, you run the risk of shooting yourself in the arms and hands. Shooting yourself in a gunfight still counts.
  7. You’re probably not fast enough to make it work at arm’s length. I’m not. Not from concealment. This technique was designed for people who carry outside the waistband. You will eat so many punches/stabs at arm’s length that the trade isn’t worth it. You need to deal with the adversary’s forward drive and strikes FIRST. Then you get to shoot him.
  8. Since we understand the criminal assault paradigm, we realize that we likely will be engaged in some verbal judo with our adversary as he tries to close distance and find the opportunity to launch his ambush. This will create a cognitive load which WILL slow down our reaction time. So by the time you clear leather, he’s on you and you’re on the ground with your gun out. Bad trade.
  9. You’ll likely not initiate the shooting whether police or citizen. He/They will make the first move. You’ll likely be reactionary. This is the way of things when you’re the good guy. There are ways to spot pre-assault cues which will clue you in that something is about to happen, but good people have trouble being aggressive enough, fast enough.
  10. This won’t work in a confined space or against a wall. Your back has nowhere to go. The technique calls for ‘full retreat’ while shooting from the hip and leaning back. We live in a world of curbs, bumpers, bollards, and walls. That means tripping.

“What Do You Advocate Then, smartass?”

  1. I learned these principles from the Shiv-Works collective. Craig Douglas, Paul Sharp, Cecil Burch, Chris Fry, and Larry Lindenman. I have seen versions of the same postural cues and retention shooting from Active Response Training, Tactical Response, and a boatload of other schools and books. The good technique is so prevalent that I find it hard to believe the speed rock is still a thing, hence the post.
  2. If we make it our mission to try to stay upright, stay mobile, and most importantly, stay conscious, then we have a spring board to drive our technique.
  3. Adopt an athletic base. Hips low, nose-over-toes (weight on balls of feet), strong posture, aligned spine. Ready to deliver or receive forward drive.
  4. When you’re reacting to your adversary’s attack at this distance, it’s foolhardy to attempt to get your gun into play. You have to deal with his forward pressure and strikes/stabs FIRST.
  5. The less-than-ideal target zone of the hips and stomach serve to diminish our opponents ability to fight. As he soaks up rounds with no obvious recourse, his will to fight will fade, and you can improve your position and make more vital-area hits if required.
  6. The dropped elbow retention position is serviceable with good posture. Elbow retracted back as soon as you clear leather, forearm indexed along ribs, slight downward angle to shots. At least we know where they’ll land.

    Greg Ellifritz from Active Response Training demonstrating a retention position along with a fending off-side arm.
    Greg Ellifritz from Active Response Training demonstrating a tight retention position along with a fending off-side arm. Note downward angle of shots, forward posture, and no intersection of muzzle line with shooter’s body.
  7. I feel that an even more defensible and repeatable position exists. It’s simply the ‘count 2’ of the draw I prefer. Elbow retracted straight up and back, thumb flagged away from slide as a standoff, thumb indexed on the pectoral muscle, bunched tight trap muscle. This creates a repeatable downward angled shot path that won’t intersect in your other arm, which is probably fending or tied up with your adversary. It also works in the horizontal plane (read: on your back). Watch Craig Douglas work this position on the range. Video by Ballistic Radio.
  8. You might need to weather the initial storm of the attack. Learn a solid non-diagnostic default position to survive the first volley. Here’s a great article about options.

In Closing

These are the best methods I’ve seen and used in high pressure force-on-force training (which is as close as we can get to a gunfight without losing training partners). If you think I’m full of shit, I encourage you to get a bite guard, some MMA gloves, a blue gun, a buddy, and a grassy field and work it. If you’re near me, I’ll work it with you. Start slowly and ramp up the pressure until you have a competitive ‘gun-fight’ and see which method keeps you on your feet longer and absorbing fewer strikes. Test, refine, repeat.

Oh, and don’t believe everything you see on the internet.

Mark

If you find value in my posts, please consider subscribing and sharing. And please do your Amazon shopping through our affiliate link.


Handgun Drills: 25 Yard B-8 Practice

Watch this video from today’s Munich active shooter:

The photographer of this footage appears to be across an intersection from the shooter. I’d put him at 30 or so yards.

Now, put yourself in the photographer’s shoes. But you’re packing your carry gun. Can you reliably place accurate hits on important parts of a bad guy at that distance?

  • If yes, good keep carrying your gun.
  • If not, keep working on it.
  • If you don’t know if you could, then you need to find your maximum effective range with your carry handgun.
Munich 7/22/16

A drill to work during your next range trip:

  • Using a B-8 target. B-8 pdf (download a copy, and always print ‘fit to page’)

Start at 10 yards.

  1. Shoot target 10 times at 10 yards, no time limit, freestyle. If/When you can get 10/10 in the 8 ring or better, move the target away 5 more yards.
  2. Shoot the same drill at 15. Same Pass/Fail metric. Keep pushing back if you can.

… eventually you will hit your distance limit. 25 yards is the goal, but further is fine. You now know your maximum reliably effective range.

At this or future range trips… Work at the distance that caused you misses. Work it until you can shoot it clean, Then keep creeping back.

Modify it by doing 10 repetitions from the holster/1 shot on the bullseye. Or, set a time limit in which you’d like to make that shot, start at a 5 second par-time from a low ready, or 7 seconds from the holster.

A B-8 is head-sized at 25 yards, and simulates a high-center chest sized target as if it were at 50. The bad guys are out there, and need to be shot. Carry your gun. Do your part.

Stay Safe and Prayers Out to our Brothers and Sisters in Munich,

Mark

If you find value in my ramblings, please subscribe, share, and shop through our amazon affiliate link.